 Figure 0.a | 
| |
Figure 0.b -> |
Download HxD from here
(We
recommend the Portable version.)
The steps below show how any 'user accessible data' (of 1 byte to about 1 Gigabyte[1]), can be saved to a binary file using the free hex/disk editor, HxD. Save a disk's MBR (Master Boot Record) or Volume Boot Sector, or copy many sectors (such as the first 100 or 2100). Data can be saved from an HDD (spinning hard disk drive), SSD (Solid State Drive - no moving parts), removable diskettes in a 'floppy drive', USB drives[2], a CD or DVD in an 'Optical drive'[3] or even from a PC's Memory.
Please Note: Unlike the Windows® XP OS, if you run HxD under Windows Vista, 7, 8 or later, you will need to explicitly grant it administrator privileges in order to even read data from a drive! So you must start the program as follows: 1) Right-click on "HxD.exe" or its Desktop icon, then choose "Run as administrator" 2) When asked to allow HxD to make changes; even though you will only read data from a drive, you must click on "Yes" in order to access your disk drives. Note: For reading and writing files from/to a logical drive (i.e., when using HxD as a simple file editor), you do not need to do either of these!
Figure 0.a |
| |
Figure 0.b -> |
Note: If you like Keyboard Shortcuts, pressing an 'ALT' key will underline the shortcut keys in the menus.
How to Save Data from Storage Media to Binary Files
1. Open HxD's "Extras" menu and select "Open disk..." to access disks connected to your PC. (Note: clicking on the 'Open disk icon' circled in BLUE in Figure 1a below will do the same thing.) If you have many disks or partitions, it will take some time for HxD to access and examine them. An 'Open disk' window will eventually appear. You can choose either "Logical" drives (Windows assigns 'letters' to logical drives) or "Physical disks" to open.
NOTE: For this exercise, choose 'Hard Disk 1' as shown here, making sure the "Open as Readonly" box is checked (so you will not accidentally write[4] to your drive):
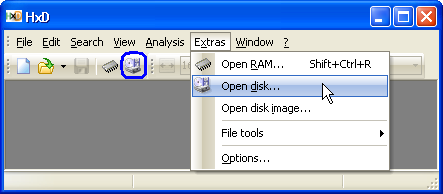 Figure 1.a Use your mouse, or 'ALT + X' on keyboard to choose a Logical or Physical disk to open. Physical disk types begin with digit '1'. | 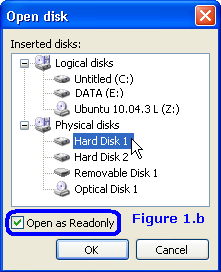 |
2. HxD will always open at 'Sector 0' of a disk drive; here we see the beginning of an MBR sector on a 750 GB hard disk:

Learning some basic controls. We encourage you to take some time observing what happens when you do the following:
a) With your 'mouse cursor' at the left or in the middle of the first byte, press and hold down its left button while you drag the cursor towards the bottom for just a few lines. You should immediately see all the bytes become 'highlighted'. Release the button and they will remain that way. This is one way to 'select' bytes. You should also notice two new items have appeared in the 'Status Bar' (at the bottom of HxD's window): "Block:" will show the starting and ending offsets of the selected bytes, and "Length:" will show the total number of bytes selected. Note: Changing the 'Offset base' setting from 'hex' to 'dec' will show the 'Length' and all 'offsets' in decimal. Use the selection here (in BLUE circle):

b) Now, while holding down a 'SHIFT' key, press the 'Down Arrow' key once, then release both keys. You should see an additional row of bytes
become highlighted. Use the SHIFT key again, but press the 'Page Down' key one time; release both. When holding down the SHIFT key, if you left-click with
the 'mouse cursor' somewhere beyond a highlighted Block, all the bytes in between will be added to the selection, but clicking somewhere inside that Block
of selected bytes will un-select those bytes; making where you clicked the new end of the selected bytes Block.
c) If you press any Arrow or Page keys without holding down a SHIFT key, the highlighting will disappear as will the 'Block' and 'Length'
items from the Status Bar. Left-clicking the 'mouse' (without holding down the SHIFT key) will have the same effect.
d) Watch the "Sector" numbers change while holding down the 'Page Down' key. In just 5 seconds, you'll probably scroll through more than
200 sectors. (Note: When you are selecting bytes, the Sector number will not change; it will remain fixed at the sector your selection began at, but both
the "Block:" and "Length:" values will change as fast as the selected bytes do.) To get back to the first sector, you can do
one of the following:
1) | Press the 'Control' + 'Home' keys (or 'ALT' + 'Home' keys) at the same time; using 'Control' + 'End' keys will go to the very last byte of the whole drive! (The 'ALT' + 'End' keys will jump to the first byte of the very last Sector of the drive!) or |
2) | Type '0' into the 'Sector' box and press the 'ENTER' key or |
3) | Click on the |
3. Use 2. d) 1), 2) or 3) to be sure you're at 'Sector 0'. [No matter what kind of Windows or Linux OS boots-up from a disk drive, there should always be some kind of code and data in its first sector. And whether it's a 'Basic' or 'Dynamic' drive, or even GPT partitioned, the Partition Table should always have at least one entry to keep any MBR utility from 'thinking' the disk has not been partitioned!]
4. SELECT the bytes to copy: In step 2, you learned how to select bytes by dragging a 'mouse cursor' across them, but for a large number of sectors, it's best to use the "Select block..." window (in Figure 3 below) by simply pressing the "Control + E" keys to pop it up, or choose it from the "Edit" menu.
 | Figure 3. To Select the First
100 or 2100 Sectors of a Drive In this pop-up window, make sure to: |
5. To COPY the 'Selected' bytes, you only need to do one of the following:
a) Press the "Control + C"
keys, or
b) Click on the "Edit" menu and choose "Copy", or
c) Put 'mouse cursor' somewhere in the
'Selected bytes' area, then 'Right-click' and choose "Copy" from the pop-up menu.
6. To SAVE the copied bytes to a binary file, do the following:
a) Press the 'Control + N' keys (or click on the "File" menu and choose "New") to
start a new temporary file!
b) Use either the 'Control + B' or 'Control + V' keys (it makes no difference if you use "Paste write" or
"Paste insert") to copy data into a new ('Untitled') empty TAB. (Or, select either one from the "Edit" menu).
c) Click the "OK" button in 'Confirm' pop-up window to proceed (to insert/write data). The new data will be colored RED to indicate that it has not yet been SAVED to a file.
d) Press the 'ALT + F + A' keys (or click on the "File" menu and choose "Save as...").
In the pop-up window, navigate to a folder such as "My Documents" or another easy to remember folder, type in a "File name"
(we suggest: 1HDD100S.BIN for the first disk drive's first 100 Sectors; 2DD2100S.BIN, for second disk drive's first 2100 Sectors, etc.).
e) Click the "Save" button, and the TAB Title should change to the File Name you entered and the RED data change
to BLACK; both indicating the file has been saved.
7. Right-click on the TAB and close it. Check that the file was saved correctly to the folder you chose.
8. If you wish to send us any copied data for analysis, please put the file(s); especially those with many sectors, into a single .ZIP or other archive file!
Checking VBRs (Volume Boot Records) on a Drive
1) If your PC is running a Windows® XP (or earlier) OS, your boot partition will most likely be the first one, on your first disk, at an offset of 63 sectors. Of course, you'd need to verify that with the PC's Partition Table, but we can still take a quick look to see if anything is there: Open your 'Hard Disk 1' as a 'Physical disk' (see Figure 1 above and associated instructions), then ENTER '63' into HxD's Sector box. For an NTFS formatted partition, under Windows® XP, the first and following sectors should appear very similar (for the Boot Sector) and have exactly the same code for Sectors 64 through 69 as those shown on our page here (the 'NTLDR' section itself being 2,934 bytes): Disk Editor View of the NTFS Boot Sector and "Bootstrap Code". You should see these messages near the end of Sector 63: "A disk read error occurred.", "NTLDR is missing.", "NTLDR is compressed." and "Press Ctrl+Alt+Del to restart."
2) If your PC is running Windows® 7 (or 8), it's also most likely your boot partition will be the first one, on your first disk, but at an offset of 2048 sectors instead. So, you would ENTER '2048' into the 'Sector' box. And though it will highly likely be an NTFS partition, there are some differences in the code between a Windows 7 and Windows XP NTFS Boot Records. A Win 7 Boot Sector should look very similar (there will be differences in the BPB Area) to this one: Disk Editor View of Windows 7 OS Boot Sector. And the Win 7 OS Boot Record should end in Sector 2056 (its 'BOOTMGR section' being 3,624 bytes; plus the 512-byte Boot Sector, for a total of 4,136 bytes, or 8 full sectors plus 40 bytes). You should see these messages near the end of Windows 7 Boot Sector: "A disk read error occurred.", "BOOTMGR is missing.", "BOOTMGR is compressed." and "Press Ctrl+Alt+Del to restart."
Footnotes
1[Return to Text] The amount of data that can be copied depends on how much free Memory is available. Even the commercial
hex/disk editor, WinHex, has this limitation when attempting to copy data from one large file into another. If a PC is running a 32-bit OS and with
4 GiB of Memory installed, the amount of data that can be copied will probably be limited to roughly 1.5 GiB; assuming no other programs are running;
it will also be less, depending upon whether any memory is used for an 'onboard video adapter' or other device(s). (Note: Although we have 4 GB of
Memory installed; and we could have up to 8 GB, the Computer 'Properties' under our 32-bit Windows XP Pro OS shows it cannot access more than "3.24
GB of RAM".) So a limit of 1 Gigabyte seems a fair approximation for a 32-bit OS. For a 64-bit OS; especially if the PC has 6, 8 or even more
GiB of Memory installed, this limitation will increase accordingly. WinHex and imaging programs, such as ![]() FTK Imager, use different methods when saving a whole disk drive (of hundreds of Gigabytes or
a few Terabytes) to an image file!
FTK Imager, use different methods when saving a whole disk drive (of hundreds of Gigabytes or
a few Terabytes) to an image file!
2[Return to Text] USB (or 'Removable') drives are most often formatted as a single Volume, the first sector of the drive being its Volume Boot Sector; so no MBR sector (or partition table) exists on such a drive. This is also true for floppy diskettes. Microsoft® Windows™ generally does not allow removable drives to be partitioned. However, there are utilities available for partitioning USB drives, so it is possible to find an MBR sector and partition(s) on a removable drive. Of course, if you're using an IDE(or SATA)-to-USB Adapter with a disk drive, the drive may have already been partitioned. Figure 4 shows the beginning of a FAT32 formatted 8 GB USB drive:

3[Return to Text] CD and DVD media usually have sectors of 2048 bytes each, with no readable data in the first 16 sectors.
Figure 5 shows 'Sector 16' (the 17th sector) of an install CD for the Ubuntu Linux 10.04 LTS (64-bit) OS:

4[Return to Text] With Administrator privileges granted, HxD can easily be used to read sectors from any drive, but will have problems when attempting to write to most sectors under Windows Vista / 7 / 8 or later. (This included even floppy diskettes and USB flash drives; and was one of the main issues Ma�l addressed in versions 2.0 and later, so this should no longer be a problem when using those versions! See discussions here: Fixed: Access Denied under Windows 7 on flash drive.)
Fortunately, for many of our readers, the following exceptions do include making any changes you wish to the MBR (Master Boot Record) and
saving copies of this and other critical sectors to unused portions of a drive.
Remember: To write to a disk drive, you must first UN-check
the "Open as Readonly" check box (see Figure 1.b) before you even open a drive in HxD. And as soon as you open a drive
that is no longer write-protected by HxD, you will see this warning message (Figure 6):
 Figure 6. |
And the warning in Figure 7 will always be shown just before HxD attempts to write to a drive: |  Figure 7. |
Note the following exceptions, meaning you can write to these sectors; all of which have been tested under a Windows® 7 SP1 OS, on its own disk drive (Some of these are clearly mentioned on Microsoft's web site here):

But if you attempt to write to a sector inside a partition, you will see this error message:

In order for the current version of HxD to write inside any Partitions on a disk drive while running under Vista, Windows® 7, 8 or later, the drive can not be "mounted" under the OS. Unfortunately, once Windows® Vista or later sinks its kernel claws into your drive, there does not appear to be any easy way (like there is under linux) to 'unmount' it! We first tried simply removing a file system's Windows drive letter; no help, and then placed the drive OFFLINE in Disk Management, but that doesn't work. Finally, we tried to edit a partition that was type 83h (Linux/UNIX), but the Windows 7 OS will not allow HxD to edit inside that partition either. When running HxD under a Windows® Vista / 7 / 8 or later OS, the only way we know of (at this time) to make changes inside any partition (or USB/Storage Volume) is to set its Partition Type byte to 00, reboot the PC, make the changes, set it back to its correct type and power off (or reboot) the PC again. Obviously, this method can not be used to make any changes to the same OS file system that HxD is running under!
Therefore, in order to make any changes to that partition using HxD under a Windows® Vista / 7 / 8 or later OS, it must be connected as
a slave drive to another Windows PC (with its Partition Type set to 00), or you must be able to boot your PC from another media, such as a boot
CD/DVD or a USB drive that is running a Windows® XP OS; one reason HxD is distributed as a 'portable' version.
Created: March 28, 2013 (2013.03.28).
Updated: March 31, 2013 (2013.03.31); January 1, 2015 (2015.01.01).
Last Update: March 27, 2016 (2016.03.27).
You can write to us here:
reply form (opens in a new window).![]() MBR and Boot Records Index
MBR and Boot Records Index![]() The Starman's Realm Index Page
The Starman's Realm Index Page