Tutorial on extracting the "Image File" from
a *.DIM File using HxD
(a Disk/Hex Editor)
Copyright©2005, 2008, 2015 by Daniel B. Sedory
For the purposes of this tutorial, we'll use a .DIM image file from mirrors.org that contains a copy of the original IBM PC-DOS 1.10 diskette (confirmed by its MD5 hash). The file can be downloaded from here:
http://www.mirrors.org/archived_software/www.techknight.com/esa/download/tk-dos11.zip
(152 KiB; 156,076 bytes; retrieved 10 AUG 2008, 15 FEB 2015.)
You could also search the Net for "tk-dos11.zip" or "TK-DOS11.DIM". The ZIP file at the URL above has a few interesting points
about DOS 1.10 by Tech Knight and a copy of the DIM (Disk Image Archiver) program, copyright©1992,1993 by Ray Arachelian.
Note: This tutorial is based upon a text we made for HxD's author, Maël Hörz, in November, 2005. You can download HxD, a Windows Hex/Disk editor, from here: http://www.mh-nexus.de/hxd/ (Many different languages are available for both a Windows installable and standalone (no install necessary!) version. The download for the English standalone version, 1.7.6.4, is only 777 KiB; 795,664 bytes.
Creating the IBM PC-DOS 1.10 Raw-image from *.DIM File
1) After extracting or obtaining the file, TK-DOS11.DIM, you may wish to perform an MD-5 checksum before making changes, to be sure it matches:
0c448777a515088fbdee51724d36f363 *TK-DOS11.DIM
HxD can hash (perform checksums on) files! After opening the file in HxD, select "Analysis" from the top menu and choose "Checksums..." to pop-up the "Generate checksums" window. Under "Available algorithms," scroll down until you find "MD-5" and select it. You can either click "OK" now, or select the "Compare with checksum" box, enter the checksum from above and have HxD check the value for you:
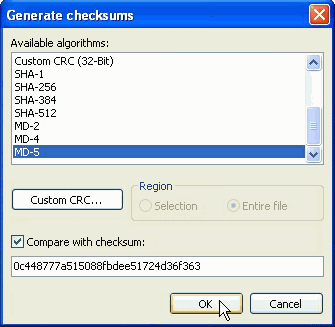
If the checksum matches, HxD will display a little check mark next to it; if not, you'll see a bright red circle!
2) Remove the first 84 bytes (that's 54 in hex; 0x54) of the file! Your hex editor will show either 84 when in decimal mode, or 54 under hex, when deleting these bytes:
Offset      0  1  2  3  4  5  6  7   8  9  A  B  C  D  E  F
00000000   44 69 73 6B 20 49 4D 61  67 65 20 56 45 52 20 31   Disk IMage VER 1
00000010   2E 30 20 43 6F 70 79 72  69 67 68 74 20 28 43 29   .0 Copyright (C)
00000020   20 31 39 39 32 20 52 61  79 20 41 72 61 63 68 65    1992 Ray Arache
00000030   6C 69 61 6E 2C 20 41 6C  6C 20 52 69 67 68 74 73   lian, All Rights
00000040   20 52 65 73 65 72 76 65  64 2E 00 20 20 20 20 20    Reserved..
00000050   02 27 08 00                                        .'..
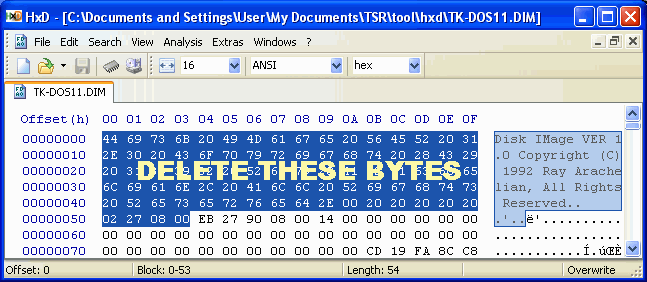
Fig.1. Screen Capture of HxD with the 84 bytes selected for deletion.
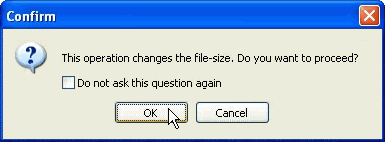
In HxD, just press the DEL key and confirm ("OK") to remove the bytes:
3) Now we must delete *every occurrence* of the following 8 (eight) bytes:
Offset      0  1  2  3  4  5  6  7   8  9  A  B  C  D  E  F
00001000   B0 A3 AA 4C F5 1A 1E C5                            °£ªLõ..Å
In HxD, as in most hex editors, you can do this by using its REPLACE function: At the top menu click on "Search," choose "Replace," enter the bytes shown above in the "Search for:" box, leave "Replace with:" box empty (blank), make sure the "Datatype" is "Hex-values" and select "All" for "Search direction" to be sure (do not select "Prompt on replace" or HxD will prompt you for every occurrence!):
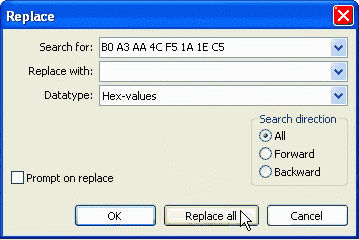
Details (for those who want/need to know): This hex-string occurs 40 (forty) times in our file. It appears that DIM inserts these bytes at intervals of every 1000 hex bytes of the original image file. For example, after removing the 84 header bytes, the remainder of the file contains this 8-byte string at offsets 1000h, 2008h, 3010h, 4018h, 5020h, 6028h, 7030h, 8038h, etc.; the string, of course, increases the size of the file by 8 bytes every time it's used (40 x 8 = 320 extra bytes). We began with a file of 164,244 bytes, removed (84 + 320) 404 bytes, so we're left with: (164,244 - 404) 163,840 bytes. We have not yet discovered any significance for choosing these particular 8 repeating bytes ("°£ªLõ..Å"). However, 1000 hex bytes is the equivalent of 8 (eight) 512-byte sectors (4,096 bytes); which means these bytes were inserted at the beginning of every 8-th sector. And since this is an image file for a disk having only 8 sectors per track and 40 tracks, these bytes would also mark the beginning of each track on the diskette!
HxD pops up a little "Information" window which states:
| Replaced 40 occurrences of "B0 A3 AA 4C F5 1A 1E C5". |
Click on the "OK" button.
4) You should now have a file that is 28,000 hex or 163,840 bytes long. This is the exact size of the old 160 KiB IBM PC diskettes. Save this file with an *.img, *.raw, *.bin, *.dsk, *.flp, *.dd or even *.160 extension and a file name that helps you remember it's a raw or binary 160KiB image file of the IBM PC-DOS 1.10 diskette, such as: PCDOS11.160 (do not use WinImage to look at this diskette image; it will fail miserably, because it was never programmed to deal with Non-standard boot records in an elegant way!).
5) To be absolutely sure that you have an exact copy of the original English IBM PC-DOS version 1.10, run an MD5 checksum on your saved file. It should be:
MD-5: 47BFB4371D28CD9E45FB1197F2A70C00
If it matches, then you have an original IBM Personal Computer DOS 1.10 image file, and you can run this under a number of free emulators; such as, BOCHS once you've set the BOCHS configuration file correctly. HINT: make sure you have read and understood the following from the BOCHS config file:
#=======================================================================
# FLOPPY_BOOTSIG_CHECK: disabled=[0|1]
# Enables or disables the 0xaa55 signature check on boot floppies
# Defaults to disabled=0
# Examples:
#   floppy_bootsig_check: disabled=0
#   floppy_bootsig_check: disabled=1   <<===== YOU MUST USE THIS ONE!
#                                      Or, you'll get an error message:
#                                      "FATAL: Not a bootable diskette"
#
#  THIS IS VERY IMPORTANT, SINCE IBM DOS 1.10 HAS NO BIOS PARAMETER
#  BLOCK, NOR EVEN THE STANDARD BOOT SECTOR SIGNATURE OF AA55h!
#=======================================================================
floppy_bootsig_check: disabled=1

EOF. 2005. The Starman.
Of course, you won't be able to carry out many of the system commands (like trying to format a new diskette image) or any of the BASIC commands this way, since BOCHS's BIOS file does not have the same content as an original IBM PC computer! But you will be able extract all of its files and view its contents as described on our page here.