Figure 1.
Even though we've specified
the MD5 sums for all the files on your Windows Startup Disks, there could still
be what's known as a Boot Virus*
in the Boot Record of your diskette. How? Two ways: If the computer
you created it from was infected with such a virus, or you had
placed the floppy in another machine without the write-protect
tab set correctly, then it could have a boot virus!
____________________
*NOTE: Never boot up a computer with a floppy
diskette, unless it is known good (not only
that the diskette will boot up the system OK, but also that its
boot record does not contain a boot virus)! This
page will show you how to manually check the Boot Record of any Microsoft boot
disk for boot viruses.
Although we could create an MD5 sum of the whole diskette (not easy for beginners to do or check without additional software), this would only be helpful if everyone had the same exact copy! Remember, we said that the dates/times of some files will be changed when a Startup Disk is made, and that your disk may or may not have different contents in the OEM ID field; so in each case, the MD5 sum could differ radically. And how would you check a disk that was made using only the FORMAT /s command?
In Exercise 2, however, I'll show you how to edit your Startup Disks to produce something like a "Standard Copy" for each OS version. Then I'll show you how to make an MD5 sum of those diskettes.
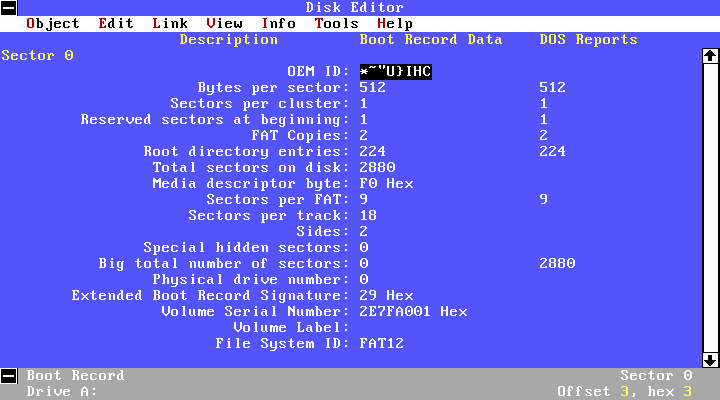
Using the Boot Record View of DISKEDIT
One of the ways you can check for a boot virus on a floppy diskette is to learn what the first sector should contain by viewing known good Boot Records. With your diskette in the A: drive, click on and open the DISKEDIT "Object" menu, then select the item "Boot Record" for a view similar to this:
Figure 1.
The first thing you may notice is the "IHC" string in the OEM ID field. If you see "MSWIN4.1" there instead, chances are that your diskette was made at the time you installed the OS. (For more info about how the Windows OSs use this field and what some think the letters "IHC" might stand for, see the notes under: DEBUG's Load command.)
Everything else you see in the DISKEDIT screen (with the exception of the Volume Serial Number), should be identical to your own Startup Disk; no matter which version you have! However, even if this display passes your scrutiny, that still doesn't mean your boot record is free of a boot virus. Why? Because what you are looking at right now is only the BPB (BIOS Parameter Block) section of the whole Boot Record. You can view all 512 bytes of the Boot sector, including the machine code (think instructions) that will actually load the MS-DOS Operating System by switching the view as follows: Using the "View" menu, select the item "as Hex" in DISKEDIT. You'll then see the whole sector like this (I've added some comments to it; in red, yellow and greeen):
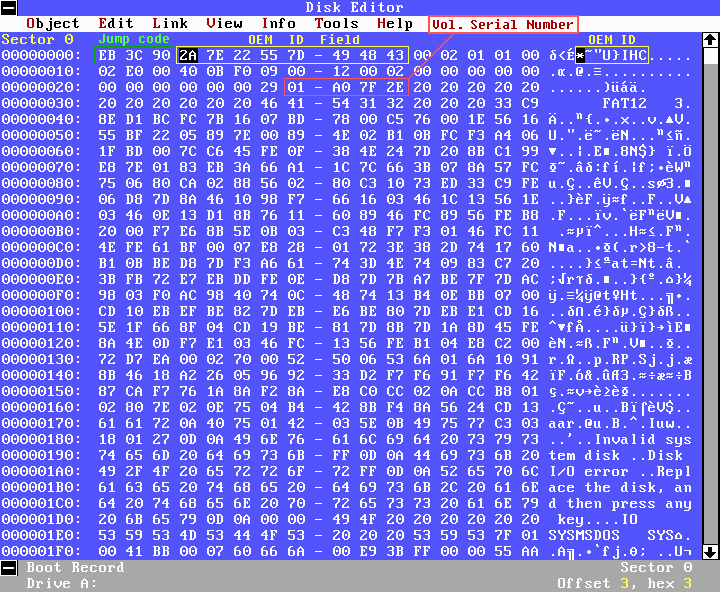
Fig. 2. A
composite of two DISKEDIT screens so the whole Boot Record can be shown.
The Boot Record's error messages can clearly
be seen near the bottom of the sector. If we made sure that the OEM ID
field were "MSWIN4.1" for all of our disks, then every byte
in each Windows Startup Disk's Boot Record (except
for those that make up the Volume Serial Number) should all be
exactly the same! That's because they all have the same
executabe PC (intel x86) machine code in their Boot Records! (This
is only true for the Windows Boot Disks since Windows 95 OSR2, not for
any versions of DOS or Windows prior to the introduction of the FAT32
file system!) Take a quick look at the first three bytes of the
Boot Sector; they should be: " EB
3C 90 "; if not, you already have a corrupt disk. This code
simply tells your PC to JUMP (machine code: EB) forward
by 60 bytes (3C hex = 60 decimal) over the BPB
to where the rest of the code is located (offset 3Eh or 62); the 90h
byte is code for a "No Op" instruction. You
can read more about the code and see a detailed view of all 512 bytes (with
color highlighting and a complete explanation of how the BPB bytes
are used) plus a listing of all its instructions here: The
Windows 98, 98 SE, ME and XP Startup Disk Boot Record.
Exercise
1: Saving The Boot Record's Code and Verifying
its MD5 Checksum (using some cool MS-DOS DEBUG tricks!)
[ NOTE: This exercise can be completed in any Windows OS DOS-box
or CMD-window; you do not need to switch to DOS at this time.]
NOTE: Although we could just go ahead and change the OEM ID and the Volume Serial Number to an agreed upon standard and use DEBUG to save the whole sector (something we'll do later), you should learn how to use DEBUG anyway; plus you'll be able to understand how the Batch File program I'm giving you (with a DEBUG Script file) works. And it can also be used to test any Microsoft boot disk (including the 1200 kb versions! ) without having to edit the disk's BPB!
Since it would take quite some time for you to check every single Hex byte of your Boot sector's code (and possibly introduce errors), your first assignment will be: Saving most of the Boot sector as a binary file and verifying that file's MD5 sum against this value:
23e16cca5345441fb4050fd5689823ff
When I first started this page, I had hoped to use DISKEDIT to save part of the Boot Record's code bytes to a file... But DISKEDIT can only save whole objects; either the whole first sector or nothing! WinHex is both a DISK and File Editor and would be great for doing this, but it is a commercial program. So, we'll be using Microsoft's DEBUG.EXE program that still comes with any version of Windows! Open a DOS or CMD-box, ENTER the command debug at the ">" prompt and you should then see a simple "-" (dash) symbol indicating that DEBUG is running. If you've never used DEBUG before, I recommend that you click here to open my Guide to Debug in a separate window; refer to the commands as needed. You can also enter a "?" at the "-" prompt for a brief listing of all the DEBUG commands. [NOTE: The same Debug command can be entered using either upper (capitals) or lower case; it doesn't matter.]
The memory space that Windows allocates for your DEBUG session will always be one 64 kb Segment. You can 'zero-out' that memory after DEBUG starts by entering the command: f 0 ffff 0 (this Fills each byte from 0 through FFFF with a value of 00h). This should make it easier to notice any new data that you load into DEBUG's memory. Now it's time to carry out the procedures for creating our "MSWIN4.1" binary Code (and Error Messages) File:
1) After making sure you have a Startup Disk in your A: drive (any of the four Startup Disks mentioned here will produce the same results), ENTER the command: L 100 0 0 1 . This will Load data beginning at memory offset 100 hex (in our allocated Segment), from disk device 0 (the A: drive), Sector 0 and a total number of 1 sectors. You can check to make sure that the bytes of the Boot Record were actually loaded by entering the Dump command: d 100 2ff and looking for the Error Messages that are located near the end of Sector 0 (note the so-called 'magic number' of AA55h at the very end):
:0280  18 01 27 0D 0A 49 6E 76-61 6C 69 64 20 73 79 73   ..'..Invalid sys
:0290  74 65 6D 20 64 69 73 6B-FF 0D 0A 44 69 73 6B 20   tem disk...Disk
:02A0  49 2F 4F 20 65 72 72 6F-72 FF 0D 0A 52 65 70 6C   I/O error...Repl
:02B0  61 63 65 20 74 68 65 20-64 69 73 6B 2C 20 61 6E   ace the disk, an
:02C0  64 20 74 68 65 6E 20 70-72 65 73 73 20 61 6E 79   d then press any
:02D0  20 6B 65 79 0D 0A 00 00-49 4F 20 20 20 20 20 20    key....IO
:02E0  53 59 53 4D 53 44 4F 53-20 20 20 53 59 53 7F 01   SYSMSDOS   SYS..
:02F0  00 41 BB 00 07 60 66 6A-00 E9 3B FF 00 00 55 AA   .A...`fj..;...U.
If the difference between the Hex Word AA55h and the display showing the bytes "55 AA" confuses you, I guess you missed my comments on the MSWIN4.1 Floppy Disk Boot Record page about that: "The sector ends as usual with the Word-sized signature ID (or Magic number) of AA55 hex (remember that Hex Words for Intel x86 CPUs are stored in memory with the Lowest-byte first and the Highest-byte last to make processing quicker)." Look at the Volume Serial Number in Figures 1 and 2 again: This is a 4-byte (or Quad) Hex Word. In Figure 1 it appears as: 2E7FA001 Hex, but in Figure 2 you'll see that the bytes are actually stored in memory as: "01 A0 7F 2E" (with the High-byte last); thus it may be important to know if some item of data is a Hex Word and how many bytes make up that "Word" if it is.
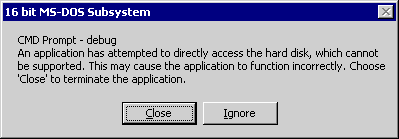
Under Windows 2000/XP, if you mistakenly enter a disk number of 2 (the C: drive) or higher rather than 0 for this DEBUG command, a warning message will pop up. You should use the "Close" button to terminate the DEBUG session and start over again:
Blame Microsoft for not fixing DEBUG.EXE to allow us to actually use it with hard disks under Windows 2000 or XP (it could have been set to 'read-only')! I'm very thankful we can still use it to Write small files to a hard disk under Windows.
2) To
eliminate the BPB (and the OEM ID) from the bytes we'll save as
a binary file, we'll move all the other code and message bytes to just
after the first 3 bytes (the JUMP code) using this Move command:
m 13e 2ff
103
. This moves (actually copies) all the bytes between memory offsets
13Eh through 2FFh to the offsets beginning at 103h. (If
you do another dump of the same 512 bytes, you can see what effect this
has on the data stored in memory.)
3) Name the file we'll be saving as "MW41BOOT" (or some other DOS name) using DEBUG's Name command: n mw41boot (the file will be saved in the same folder that you executed debug from, when you use the write command below).
4) Use DEBUG's Register command to set up how many bytes we'll be writing to your hard disk. This is a two-step process. First enter: rcx (which will cause DEBUG to display "CX 0000" on one line, followed by a ":" colon symbol on the next line). This means DEBUG is waiting for you to either accept what is already there (in which case you'd simply press the ENTER key) or to change the value to something else (which is what we want to do). The CX Register tells DEBUG how many bytes to write beginning with the byte at offset 100h. ENTER the Hex value: 1c5 (that's 453 bytes total). The OEM ID field (8 bytes) plus the BPB (51 bytes) adds up to 59 bytes, so 512 - 59 = 453 total bytes to write to our new file.
5) IF you're sure that all the previous steps were completed, ENTER the Write command: w (and DEBUG will print "Writing 001C5 bytes" on the next line). You can now 'Quit' DEBUG with the command: q .
Find the "MW41BOOT" file (or whatever you called it) and compute its MD5 checksum using any MD5 program. It must agree with the value shown above (23e16cca5345441fb4050fd5689823ff). If not, you've either made a mistake somewhere, or your Startup Disk's boot code was corrupted.
| In order to speed up the process for checking many diskettes (and test some earlier types of MS-DOS or Windows diskettes as well), I created a DOS Batch File (BCTEST.BAT) that will run DEBUG using a DEBUG Script File (CHKBOOT.DSF) which automates the whole process you went through above plus tests for MSDOS5.0 and IBM 3.3 Boot Records too. You can download all the necessary files as: BCTEST.zip. The download includes an MD5 program which can run in a Windows DOS-box or under Real DOS (making it a nice boot disk utility) and a test program (MD5TEST.BAT) to make sure MD5.EXE is functioning correctly too. |
Exercise 2: Creating a Common Startup Disk "Image File" and Verifying its MD5 Checksum
So now, you might be thinking: If we all began
with the same OEM ID of MSWIN4.1 and were to change the Volume
Serial Number of our own Startup Disk to four zero bytes and finally,
agree upon a common date/time to change the MSDOS.SYS and EBD.SYS files*
to, wouldn't my copy of the Windows Startup Disk be exactly the same as
everyone else's for my particular version? Well,
you're getting close! And as you already know, that will be part of Exercise
2 (making a completely common Startup Disk for your Windows
OS version). Now you must learn how to use DISKEDIT to make changes and write
them to your diskette; you will need to switch to Real DOS for this!
_____________________
* Note: The Win XP Disk does not
have an EBD.SYS file. The only files which reflect when it's made are the files
AUTOEXEC.BAT and CONFIG.SYS (which are created as zero-length
files on this disk).
Before getting into the details of what to change, let's cover what you need to do in order to write data to your diskette: 1) Make sure that the write-protect tab isn't set to read-only! Sometimes people forget! 2) DISKEDIT itself has a software 'Read-only' setting that sometimes gets set when you first start the program: Open the "Tools" menu, select the item "Configuration . . ." and make sure that the "Read Only" checkbox is not checked. This figure shows what are normally the best settings for everyone to use at this point:
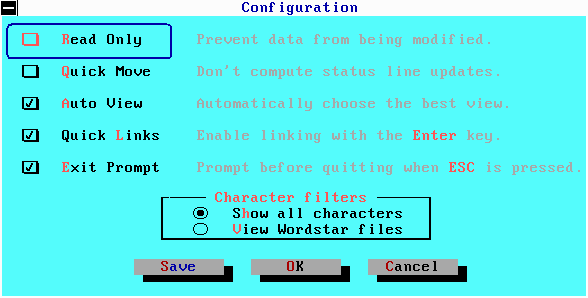
Figure 3.
Using DISKEDIT's "Object" menu, select "Boot Record" once again. If you were already in DOS and looking at the Boot Record "as Hex", then switch back to what would more appropriately called the "BPB view" of the first sector by selecting the following:
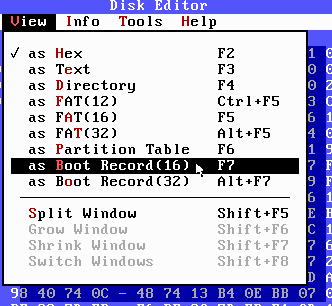
Figure 4.
Note that there's no choice for a 'FAT12 Boot Record' in the menu, since it's exactly the same as that for a FAT16 partition's Boot Record; the Boot Record itself needed to be changed for FAT32 partitions though.
Using your mouse and/or keyboard, move to the OEM ID field and enter the phrase "MSWIN4.1" (unless it's already there).
[Some helpful Notes: 1) It may be easier for you to erase all the characters already in a field before entering new ones. 2) Until you've used DISKEDIT to edit a number of disks, you may wish to check the fields you've edited by switching back and forth between the "Hex" and "Boot Record" views of this sector. 3) If you try to enter too many characters, you'll hear a beep from the PC's Speaker!]
Next you must change the Volume Serial Number to four zero bytes; be careful not to change the Volume Label field (it's already filled with eleven, 20 hex bytes; that's 11 blank spaces).
Now you can write your changes to the diskette in two different ways: 1) Either choose to view another portion of the disk (in which case, DISKEDIT will ask if you want to save any changes you just made to Sector 0), or: 2) you can initiate the save (while remaining in the same sector) by clicking on "Edit" and selecting "Write Changes . . ." from the menu; DISKEDIT will still ask if that's what you want to do. Your screen should look just like this before "writing" (saving) the sector to disk:
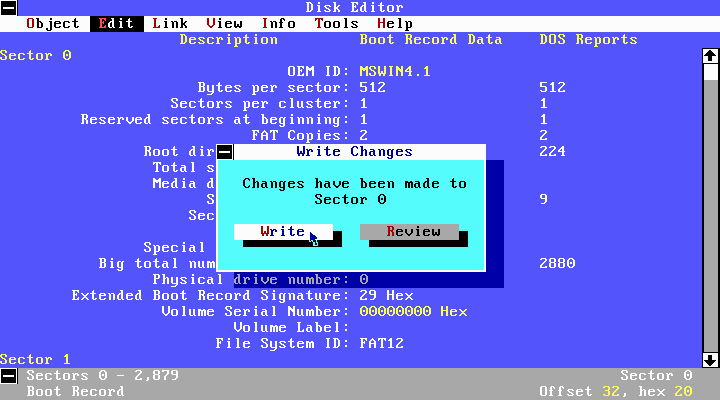
Figure 5.
Before working on the rest of the disk, you'll now learn how to save an "object" in DISKEDIT as a binary file on your hard drive. Go back to the "Object" menu and select "Boot Record" to make sure that DISKEDIT is set to view only Sector 0 of your diskette. [You may have noticed that in Figure 5 above, the bottom of the display says: Sectors 0 - 2,879; not just Sector 0. That's because DISKEDIT began with the whole disk as the object and the "View" was switched from "as Hex" to "as Boot Record (16)" which does not affect the object setting. To save only the Boot sector to a file on your hard disk, you must make only that sector the "object" (you'll see only "Boot Record" or "Sector 0" at the bottom of your screen when it is) using the "Object" menu.]
If you run Windows 2000 or XP, I'd normally recommend that you use NTFS for your operating partition. But keep in mind that many utility programs and boot disks were written for FAT partitions. So, I'd also advise setting aside some space for one or more partitions of a few Gigabytes formatted with FAT32 for occasions when a FAT partition is required (for example: If you ever want to use Linux, that OS can not safely 'write' to an NTFS partition and some Linux kernels today aren't even set up to 'read' from one! So you would use a FAT32 partition as a sort of buffer area for moving data from your Win OS into Linux). IF you have no choice at all in making a FAT32 (or FAT16) partition on any hard disk, your only other alternative for learning how to write an object with DISKEDIT is to have two FLOPPY drives and write to a formatted floppy.
Consider this as 'practice' for writing the whole diskette later on. You can: 1) Open the "Tools" menu and select the "Write Object To . . ." item, or: 2) Simply press the ALT+"W" keys; either of which should immediately pop up a window like this:
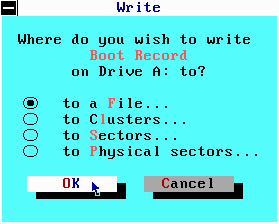
Figure 6.
If you see anything other than "Boot Record" in the pop-up, Cancel the operation and review the text above on objects! After making sure that the item "to a File . . ." is selected, press the "OK" button. That causes the Write dialog to open. You'll need to choose a Drive and Path (such as "C:" and "Startup"), and enter a File name (such as MSWIN41.BIN) in the dialog box. Here are the ones we used:
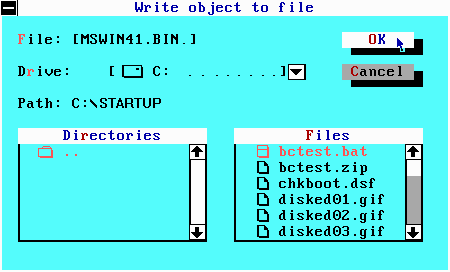
Figure 7.
DISKEDIT will still give you one more chance to decide if this is what you really want to do by popping up yet another box that states: "Are you sure you want to write Boot Record to C:\STARTUP\MSWIN41.BIN" followed by a "Yes" and "No" button! Click on the "Yes" button; you may briefly see a 'progress window' pop up as the file is being written to your disk.
Using either the MD5.EXE program (from the previous exercise) while still under DOS or in a Windows DOS-box or some 32-bit MD5 program once you've booted back into Windows, compute the MD5 sum of the MSWIN4.1 Boot Record that we just created.
badf6f76fdd0813824471ec3cbd36317
Unlike the Boot Code Test program above, this
MD5 sum will only be valid for a 1440 kb floppy diskette having
an OEM ID of "MSWIN4.1" and a Volume
Serial Number of "0000-0000"
[You might've noticed something familiar about the beginning of this
MD5 sum: It's just a coincidence that it begins with "badf6"
since "bad sectors" sometimes show up in disk editors as being
filled with "F6h" bytes; not to mention the other abbreviations
I can think of using "fdd" (floppy disk drive), "bd" (boot
disk, etc.)... just having a little fun here to keep from being bored.]
The Starman.
Last Update: September 1, 2005.
![]() The
Starman's Realm Index Page
The
Starman's Realm Index Page