NOTE: This page is Copyright©2003-2007 by Daniel B. Sedory
Get the latest *.zip version available here:
TestDisk is presently at version 6.7
TestDisk
is a GNU Public Licensed OpenSource Program.
NOTE: This page is Copyright©2003-2007
by Daniel B. Sedory
Get the latest *.zip version available here:
![]() http://www.cgsecurity.org/wiki/TestDisk
http://www.cgsecurity.org/wiki/TestDisk
TestDisk is presently at version 6.7
NOTE:
This page is going through a major revision!
Be sure to check all documentation against the wiki
pages found at the URL listed above for TestDisk!
Here we discuss the use of TestDisk to recover a partition that has been accidentally deleted (e.g., by a utility such as DELpart, FDISK or any other program that will overwrite a drive's MBR sector, EBR sectors and/or the disk's first track -- such as ZAP63 will do). If any area of both copies of a FAT partition's FAT have already been overwritten by a Format program (or by MS-FDISK), chances are that TestDisk will not be able to return the partition eactly to its former state; you'd need to use a data recovery program on at least some of its subdirectories in that case. TestDisk's new file recovery functions may depend upon what data has been left in various $MFT files (for NTFS), sub-folders (for all FAT or other file systems) and inodes and other structures under Linux, *nix and various associated file systems.
Although TestDisk
can be run from hard drives (under Linux, Windows 9x, Win 2000/XP,
Vista or possibly some other OS), it's recommended that you do so only if
the target drive (the one having lost partitions) was formatted on the same
type of computer (one using the same BIOS for HDD geometry). If your computer
has only one bootable partition (the 'lost' partition), then boot the computer
with a DOS/Win9x boot disk and run TestDisk from a floppy diskette (the file
cwsdpmi.exe must also be on the same floppy disk to give TestDisk the
necessary 32-bit capabilities under DOS). This method is not only safer (as
far as Geometry and the BIOS is concerned), but saves you all the hassles of
trying to hook up the target drive as a slave on some other computer!
[For
the experts who understand the various methods used to translate "drive
geometry" by different BIOS manufacturers, TestDisk has a "Geometry
function" you can use to set a drive's geometry while running TD.]
When TestDisk is executed, it should first appear like this:
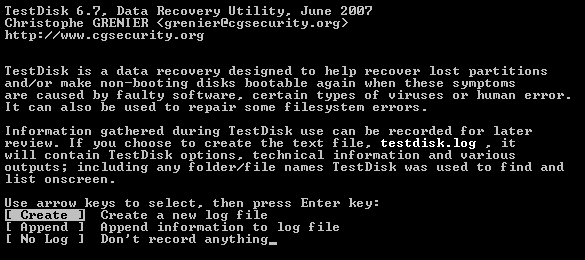
Fig.1:
TestDisk's "Main" Screen (not to scale).
Carefully read everything on the screen the first time you use TestDisk to get familiar with all its functions. The "Create," "Append" and "No Log" choices are for managing a text file, "testdisk.log" which saves data related to your drive(s) while TD is running. Almost everything will be recorded if you choose to create this file, so please don't experiment with TD's functions; especially the "P" key (which lists all the files TD can find; explanation below), if you intend on sending us this log file!
TD's next screen should be similar to this:

Fig.2:
TestDisk's "Drive Selection" Screen (not to scale).
If more than one
drive were attached, you would first use the up and down arrow keys to select
the target drive, then press the ENTER key while
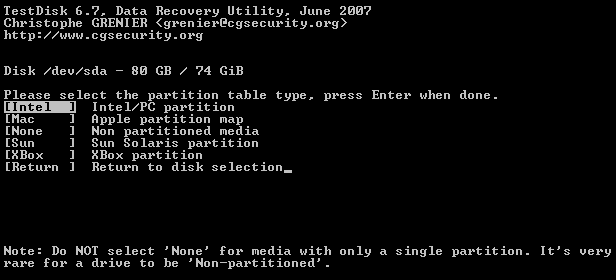
Fig.3:
TestDisk's "Computer Type" Screen (not to scale).
NOTE:
All text below this line is from a now out-of-date ver. of TestDisk!
Fig.2:
"Check Current Partition Structure" (not to scale).
This shows that the MBR currently has no Partition Table entries in it; which is what we expected having deleted the only entry before running TestDisk.
|
If you see a display like this instead:
Then most likely your entire MBR sector was filled with zero bytes by some zap or wipe utility! TestDisk checks only the 64 bytes that make up the Partition Table and the last two bytes of the MBR to see if they are the Hex Word "AA55" (i.e., the bytes 55 AA in that order on the disk). If the last two bytes have a problem, you'll see the display above. [Note: If you suspect that any of the MBR code has been damaged, you should first run FDISK /MBR from a Win98 Boot Disk or use TestDisk's "MBR Code" Option; since TestDisk obviously can't test for every type of MBR code in existence!] Once you see the screen above, you must press the ENTER key a couple more times to get back to the Main display (hopefully that will be changed in a future version of TestDisk) where you can finally write a copy of the Standard MBR code:
Once you've highlighted "[ MBR Code ]" and pressed the ENTER key, TestDisk will respond with: "Write a new copy of MBR code to first sector? (Y/N)_"; press the Y key to do so, then highlight "[ Analyse ]" and press the ENTER key again. |
The next display will show TestDisk counting through each of the cylinders as it further analyzes the drive:
Fig.5:
TestDisk's "Analyse Cylinders" (not to scale).
Be careful not to press the ENTER key at this time, or you'll 'Stop' the analysis! Once the Analysis is complete, TestDisk will present a display similar to this:
Fig.6:
TestDisk's "Current Structure" display (not to scale).
For this simple
case, TestDisk has already set the only partition it could find to be the "Primary
bootable" partition. However, if your drive has many partitions (especially
if you had previously deleted partitions -- let's call them ghosts;
which overlap or are overlapped by newer partitions created after them),
then it will be up to you to decide which of these are the most recent partitions
that need to be placed into the Partition Table.
Pressing the 'P'
key to list and verify the files that TestDisk finds in one of
these partitions can help a great deal in deciding what to leave marked as D=Deleted
or change to the *=bootable Primary, P=Primary
or L=Logical
partition. (Use the Right and Left Arrow keys to make these changes.)
[Note: To recover and set the partitions
correctly for a large drive with many different partitions may require you to
learn a bit about how Primary, Extended and Logical partitions
are used on such a drive!]
After pressing the 'P' key, you can use the Right Arrow key when a directory <DIR> is 'highlighted' to see files inside that folder as well. Here's what the simple listing of some files in my test drive's DOS folder looked like:
Fig.7:
TestDisk can list all the files in a partition! (not to scale).
Pressing the Right Arrow key while a ".." <DIR> is selected, will take you back the parent folder. With the release of TD version 4.4, you can now use the PageUp or PageDown key as well. The point of being able to move through every file listing is to make sure that this is the partition you want to recover. (Press the ENTER key to quit the 'File Listing' View.)
After pressing the ENTER key again, we arrive at the following display where you decide if you want to write the changes you made in memory to the hard drive's MBR (and EBR) sectors:
Fig.8:
TestDisk's "Quit, Search!
or Write" Screen (not to
scale).
IF you were not satisfied by TestDisk's results in the previous displays, you can always try using the " Search! " Option which will do a much more detailed search of the drive!
Once you have decided the partitions are correct, move the highlight over the " Write " selection like this:

Fig.9:
"Write partition structure to disk."
and press the ENTER key, whereupon TestDisk will ask you: " Confirm ? (Y/N) " so press the Y key to complete the write to disk. Finally, you will be returned to the Main display where you can use the Left or Right Arrow keys to move the highlight over the " Quit program " selection.
I suggest that you try booting up your computer with the Win98 Boot Disk again, to check your partitions under DOS rather than trying to jump right into Windows (just in case there's a big mistake in the partition size or something)!
|
Appendix
-- The FAT32 Boot Record under Lastly, for those who'd like to check out the "[ Advanced ]" Option of TestDisk (for FAT partitions only), here are a few displays of a FAT32 Boot Record being examined under TestDisk:
There are only a few functions that TestDisk can carry out on Boot Records... mostly synchronizing the bytes of the first copy to the second, or vice versa. But you can safely view every byte in both copies first:
In this case the Boot and Backup sectors are identical; if they weren't, you'd be offered a choice of copying one to the other. Read the following NOTE! It gives you an idea why these functions are labeled ADVANCED in the Main menu! NOTE: If any of your FAT32 Boot Records and their backup sectors are not identical, you should never 'sync' them until you know exactly where and WHY there's a difference! The "Dump" command (see pic below) shows the two records side-by-side so you can look for the differences. TestDisk already knows that the 2nd sectors of FAT32 Boot Records have a valid reason for being different (and will ignore this particular type of difference): It's because the data which identifies how many free clusters are left in the volume (and where to look for them) is never updated in the backup sector! As a matter of fact, it's a good thing to begin a rebuilt Boot Record with the default value of "FF FF FF FF" hex (probably the reason they're never updated in the backups); see my page: asm/mbr/MSWIN41.htm#FSINFO for more on the FS Info Sector's default cluster values. There may also be differences in the 1st sector due to some utility trying to identify which is the 'backup' vs. the original Boot Record; again, don't make a change unless you know why it is necessary! The 3rd sector should never have any differences, since this is always filled with the same code. The "Rebuild BS" selection -- Rebuild Boot Sectors -- should be used only if you know that both copies are corrupted and preferably if you have a reference explaining what Hex values are supposed to be at which offsets (the tables on this page: asm/mbr/MSWIN41.htm#BPB should be helpful in doing so). A disk editor is essential for making any necessary changes! If you highlight the " Dump " selection and press ENTER, you'll see something similar to this:
Right Arrow over to the "Quit" and press ENTER, then either save your changes or just Quit the program like normal. |
Last Update: August 5, 2007. (2007.08.05)
You can write to me using this: online reply form. (It opens
in a new window.)
![]() The Starman's Realm Index Page
The Starman's Realm Index Page